Java多线程并发
一些基本概念
为了防止单个程序发生阻塞的现象,所以必须使用多线程或进程来解决此类问题。
进程
在操作系统中运行的的程序会占用一个进程,进程主要在执行一个程序的过程中,系统会分配给的一些资源给此进程进行执行一些程序,主要针对于硬件产生的一种并发。
是系统资源分配的基本单位。
线程
一个进程中会分配多个线程,用来是提高某个程序高并发运行。
是CPU调度和执行的基本单位,真正多线程是多个CPU(多核)共同执行。
创建线程
三种方式:
- 继承
Thread类(重点) - 使用
Runnable接口(重点) - 使用
Callable接口(了解)
继承Thread类
步骤:
- 继承
Thread类,重写run方法 - 实例化对象,使用
start()方法启动
测试:
线程1:
1 | public class Thread_1 extends Thread{ |
线程2:
1 | public class Thread_2 extends Thread{ |
主线程:
1 | import other.Thread_1; |
注意:开启线程后不会立即执行,由CPU来调度。
实现Runnable接口
步骤:
- 直接使用
Runnable接口来实现一个类 - 实现
run()方法,重新编写程序执行内容 - 实例化
Thread类,将线程对象传入其中
测试:
线程1:
1 | public class Runnable_1 implements Runnable{ |
线程2:
1 | public class Runnable_2 implements Runnable{ |
主线程:
1 | import other.Runnable_1; |
- 简写的话可以直接这样写:
new Thread(runnable_1).start()。 - 本质上,
Thread类其实也是实现的Runnable接口。 - 更推荐使用
Runnable接口,更灵活,方便一个对象被多个线程使用。
静态代理
其实Thread具体的实现原理就是使用的代理,使用接口可以巧妙实现代理的操作。
使用结婚来举个例子:
定义一个接口,表示要代理的操作(结婚):
1
2
3interface Marry{
public void happyMarry();
}“代理对象”和“真实对象”同时实现这个接口:
真实对象实现接口(人):
1
2
3
4
5class Person implements Marry{
public void happyMarry(){
System.out.println("结婚了!!");
}
}代理对象实现接口(婚庆公司):
1
2
3
4
5
6
7
8
9
10
11
12
13
14
15
16
17
18
19
20
21
22class WeddingCompany implements Marry{
public target;
public WeddingCompany(Marry target){
this.target = target;
}
public void happyMarry(){
before();
this.target.happyMarry();
after();
}
public void before(){
System.out.println("结婚前做的事");
}
public void after(){
System.out.println("结婚后做的事");
}
}这样做的好处是:
- 代理对象可以做很多真实对象做不了的事
- 真实对象只需要做自己的事就可以
回头看看Thread这个类,其实就是代理对象,Thread在之前已经实现了Runnable接口,我们使用的时候也实现了Runnable接口,所以在进行多线程的时候,就已经帮我们进行了代理。
Lamda表达式
可以主要简化一些程序的逻辑。
语法:
1 | (形参)->{ |
函数式接口
任何接口,只有一个抽象方法,就说明是一个函数接口。
1 | interface Runnable{ |
这种情况之下可以使用Lamda表达式来去替代这个接口。
举个例子:
1 | // 实现一个接口,这个接口只有一个方法 |
注意:
- 只有一行代码时,可以简化掉花括号
- 可以去掉参数类型,但必须统一,都去掉或都不去掉
那么关于Runnable接口,就可以直接写成下面的样子:
1 | new Thread(()->{ |
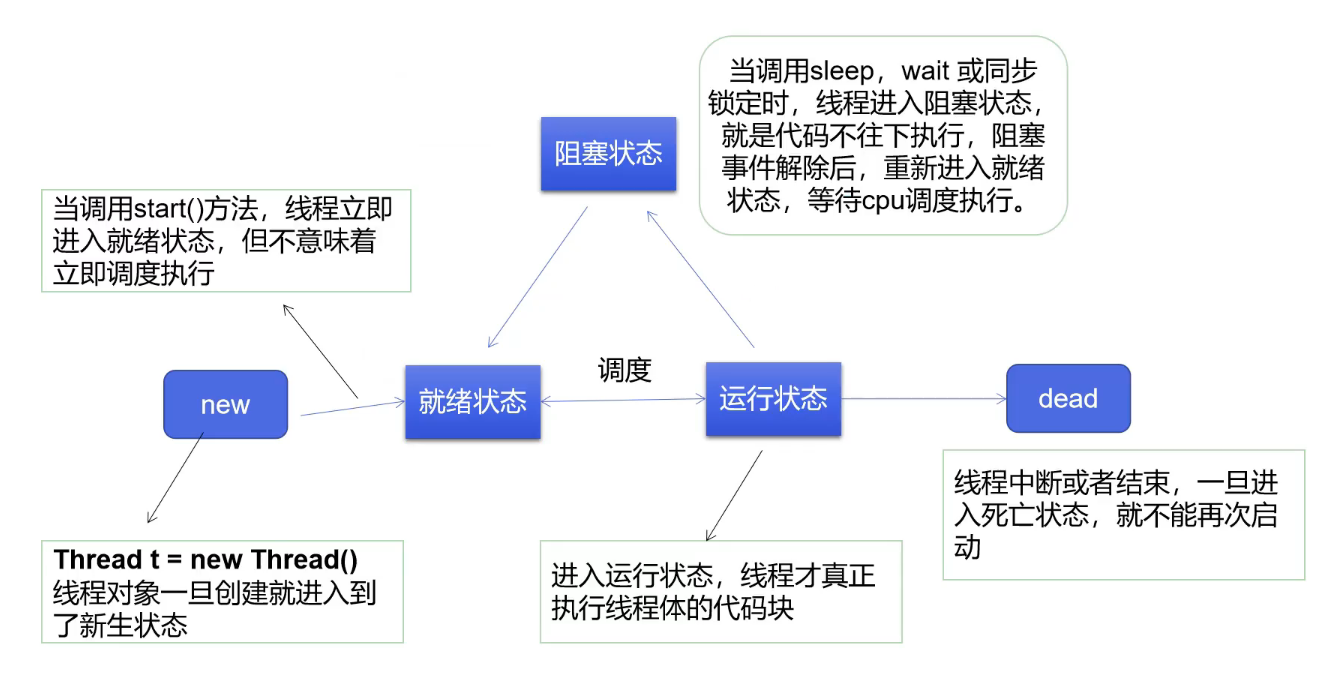
线程状态
一共五种状态,如图所示:
关于线程状态有如下方法:
| 方法 | 说明 |
|---|---|
setPriority(int newPrivority) |
更改优先级 |
static void sleep(long millis) |
指定的毫秒数内进行休眠 |
void join() |
等待线程终止 |
static void yield() |
暂停当前正在执行的线程 |
void interrupt() |
中断线程(不要使用) |
boolean isAlive() |
线程是否处于活动状态 |
停止线程
注意:停止一个线程最好使用一个标志位来检查:
1 | public class Test implements Runnable{ |
线程休眠
- 可以模拟网络延时、倒计时
- 每个对象都有一个锁,sleep不会释放锁
- sleep存在异常,需要向外抛出异常
1 | public class Sleep implements Runnable{ |
由于存在异常,要么抛出异常,要么捕获异常。
线程礼让
能够让正在运行的线程暂停,但不阻塞,将线程从运行状态转换成就绪状态。
注意:让CPU重新调度,礼让不一定能够成功。
1 | class MyYield implements Runnable{ |
线程强制执行
可以理解为插队
1 | public class TestJoin implements Runnable{ |
少使用,防止阻塞。
线程状态观测
可以使用.getState()方法来观测状态。
线程的状态在一个枚举里,其中就有:
Thread.State.NEW线程创建Thread.State.RENNABLE线程运行Thread.State.TIMED_WAITING线程等待(阻塞)Thread.State.TERMINATED线程死亡
注意:线程死亡后不能重新启动,也就是不能.start()
线程的优先级
优先级使用数字,范围为:1~10,优先级越高就先执行且分配更高的资源。默认是5优先级
也可以直接使用静态变量去描述:
Thread.MIN_PRIORITY = 1最小优先级Thread.MAX_PRIORITY = 10最大优先级Thread.NORM_PRIORITY = 5默认优先级
可以使用以下方法去处理优先级:
.getPriority()获取优先级.setPriority(int xxx)设置优先级
守护线程
线程分为用户线程和守护线程。
- 虚拟机必须保证用户线程执行完毕
- 虚拟机不用等待守护线程执行完毕
- 举例:垃圾回收、监控内存、后台记录操作日志
设置成守护线程:
1 | .setDaemon(true); |
默认是正常线程,所以是false
并发
一般会遇到同一个资源多个线程使用。
实现条件:队列 + 锁
在每个线程想使用资源的时候先获得对象的排他锁,独占资源,再执行自己的线程使用资源,其他的线程处于等待状态。
但会出现一些问题:其他线程会等待,效率变低
可以使用private关键字保证数据对象只能被方法访问,针对这种方法使用一种机制,使用synchronized关键字。
同步方法
当使用synchronized来描述方法的时候就是同步方法,每个对象控制一个锁,synchronized方法需要获得这个锁才能执行,否则线程就会堵塞。
一旦获得这个锁就会执行方法,且独占该锁,直到方法返回才释放该锁,让其他线程可以获得。
只需要在修改内存的地方使用synchronized方法,因为并不高效。
案例:
1 | public class Test { |
同步块
synchronized来修饰方法的时候,只是锁中了这个方法的对象,并没有锁中这个方法中调用的对象,需要这样去写可以锁中一个对象,这样是同步块。
案例:
1 | class Account{ |
死锁
可能会出实现两个线程锁住了两个资源,因此不能互相干涉,这时候会出现互相等对方,这样就造成了直接的阻塞,因此这样发生了死锁的问题。
案例:
象征着资源的类
1 | class Temp1{ |
死锁的必然条件:
- 互斥条件:一个资源每次被一个进程使用。
- 请求与保持条件:自己拥有资源的时候,想要获得其他资源。
- 不剥夺条件:进程已经获得的资源,在没有使用完之前,不得强行剥夺。
- 循环等待条件:若干进程之间形成头尾相连等待资源的关系。
解决的方法就是,同步块
Lock
JDK5.0开始,提供了更强大的线程同步机制——通过显示定义同步锁对象来实现同步。
- 使用
juc包中的Lock接口:java.util.concurrent.locks.Lock; ReentrantLock实现了 Lock(可重入锁),拥有与synchronized相同的并发性。
使用方法:
实例化一个Lock
1
private final ReentrantLock lock = new ReentrantLock();
加锁的地方
1
2
3
4
5
6
7
8
9// 加锁
lock.lock();
try{
//锁中的内容
}
finally{
// 解锁
lock.unlock();
}总结:
- Lock是显示锁,需要手动开关(一定要关上);
synchronized是隐式锁,出了作用域就直接释放。 - Lock只有代码块锁,
synchronized还有方法锁。 - Lock性能更好,JVM会花费更少的时间来调度。
线程协作
生产者消费者模式
指区分开生产者和消费者,在多线程中需要线程独自去扮演这些角色。
应用场景:
- 生产者生产出来的产品放入仓库中,消费者从仓库中取出来。
- 针对生产者:仓库中有产品,生产者直接放入;仓库中没有产品,生产者需要考虑是否继续生产。
- 针对消费者:仓库中有产品,消费者直接拿出使用;仓库中没有产品,消费者需要等待生产者生产并放入仓库。
只有synchronized是不够用的,只能实现同步,不能实现通信。
java的Object对象中有以下几个方法:
| 方法名 | 作用 |
|---|---|
wait() |
线程会一直等待,直到其他线程通知,与sleep不同,会释放锁 |
wait(long timeout) |
指定等待的毫秒数 |
notify() |
唤醒一个处于等待状态的线程 |
notifyAll() |
唤醒所有等待的线程,优先级越高提前唤醒 |
管程法
使用另一块缓冲区去管理资源,消费者和生产者能够访问这片区域。
1 | // 缓冲区 |
标志位法
不需要定义缓冲区,只需要定义一个标志位,用来判断是否有物品。
1 | class Activate{ |
 微信
微信 支付宝
支付宝